What is Die Cutting?

Die cutting is a manufacturing process used to generate large numbers of the same shape from a material such as wood, plastic, metal, or fabric. The die cut shapes are sometimes called “blanks,” because they are usually finished and decorated before being sold. The process is widely used on an assortment of materials all over the world, and many manufactured products contain several die cut components, often assembled together in a series of steps to create a finished product.

Sharp specially shaped blades are used in die cutting. The blade is bent into the desired shape and mounted to a strong backing. The result is known as a die. The material being cut is placed on a flat surface with a supportive backing, and the die is pressed onto the material to cut it. Depending on what is being made, a single die might cut one piece of material, or it might be designed to slice through multiple layers, generating a stack of blanks.

Many consumers find it helpful to consider a cookie cutter when thinking about die cutting. The cookie cutter is a type of die which is capable of cutting out a potentially infinite amount of blanks. Each blank will be exactly the same shape and size, meaning that the blanks can be cooked uniformly together and decorated at will for individuality. The alternative is cutting out each cookie by hand, a painstaking process which would result in irregular final products.

Creating dies is meticulous work. The die must be designed so that it efficiently cuts the desired material with minimal waste. Most factories which use die cutting as part of their manufacturing process have techniques for recycling material left over from die cutting, but they want to avoid excess if possible. Often, multiple dies are fitted together on one mount, nestled with each other for maximum efficiency. Material left over from the die cutting process may be melted down and reused, or reworked into other components.

Common examples of die cut items include keys, paper products, and flat plastic pieces which can be snapped together. Die cutting is limited, because it can only really be used to produce flat objects. For more dimensional shapes, other manufacturing techniques such as molds need to employed. Dies can also range widely in size from cookie cutters to massive machines designed to cut out ship components. With large dies, it is important to observe safety precautions while die cutting, as an industrial die designed to slice through metal can also remove a limb without difficulty.


FINE BLANKING DETAILS

DETAILED INFORMATION ON HOW FINE BLANKING WORKS
Fine blanking produces stamped parts with a clean, 100% sheared edge. This edge is the result of special tooling and a special press. To understand why this is necessary, we need to first look at the reasons why a part fractures and then how the Fine blanking Process works to overcome these conditions.

1.) Tool Clearance

In conventional stamping, clearances run 10-20% the thickness of the material. This allows the stress to be relieved by fracturing. In fine blanking, clearances run from .0001" to .0003", which does not produce fracturing.

2.) Material Movement to Relieve Stress

In conventional stamping the material will bend away from the punch, causing the part to fracture.In Fine blanking, the material is held in constraint In many situations, "impingement" is added to the clamp action to stop material from flowing away from the punch. The final element is counter force. An additional die element is added which mirrors the shape of the punch. Pressure is applied to this element throughout the process. This keeps the part from bowing away from the punch resulting in an extremely flat piece.

Fine blanking


Typical fine blanking press cross section figure

Fine blanking is a specialized form of blanking where there is no fracture zone when shearing. This is achieved by compressing the whole part and then an upper and lower punch extract the blank. This allows the process to hold very tight tolerances, and perhaps eliminate secondary operations.

Materials that can be fine blanked include aluminium,brass,copper and carbon,alloy and stainless steels. Fine blanking presses are similar to other metal stamping presses, but they have a few critical additional parts.

A typical compound fine blanking press includes a hardened punch (male), the hardened blanking die (female), and a guide plate of similar shape/size to the blanking die. The guide plate is the first applied to the material, impinging the material with a sharp protrusion or stinger around the perimeter of the die opening. Next a counter pressure is applied opposite the punch, and finally the die punch forces the material through the die opening. Since the guide plate holds the material so tightly, and since the counter pressure is applied, the material is cut in a manner more like extrusion than typical punching.

Mechanical properties of the cut benefit similarly with a hardened layer at the cut edge from the cold working of the part Because the material is so tightly held and controlled in this setup, part flatness remains very true, distortion is nearly eliminated, and edge burr is minimal.

Clearances between the die and punch are generally around 1% of the cut material thickness, which typically varies between 0.5–13 mm (0.020–0.51 in). Currently parts as thick as 19 mm (0.75 in) can be cut using fine blanking. Tolerances between ±0.0003–0.002 in (0.0076–0.051 mm) are possible based on material thickness & tensile strength, and part layout.With standard compound fine blanking processes, multiple parts can often be completed in a single operation. Parts can be pierced,partially pierced, offset (up to 75°), embossed, or coined, often in a single operation. Some combinations may require progressive fine blanking operations, in which multiple operations are performed at the same pressing station.


Advantages & disadvantages

The advantages of fine blanking are:

1)excellent dimensional control, accuracy, and repeatability through a production run.

2)excellent part flatness is retained.
straight, superior finished edges to other metal stamping processes.


3)smaller holes possible relative to thickness of material
little need to machine details.

4)multiple features can be added simultaneously in 1 operationmore economical for large production runs than traditional operations when additional machining cost and time are factored in (1000–20000 parts minimum, depending on secondary machining operations)

The disadvantages are:

1)slightly higher tooling cost when compared to traditional punching operations.

2)slightly slower than traditional punching operations.


CENTRE OF PRESSURE

CENTRE OF PRESSURE
When the shape of blank to be cut is irregular, the summation of shear forces about the centre line of press ram may not be symmetrical. Due to this, bending moments will be introduced in the press ram, producing misalignment and undesirable deflections. To avoid this the “centre of pressure” of the shearing action of the die must be found and while laying out the punch position on the punch holder, it should be ensured that the centre line of press ram passes exactly through the centre of pressure of the blank. This “centre of pressure” is the centroid of the line perimeter of the blank. It should be noted that it is not the centroid of the area of the blank.

The centre of pressure can be found out by the following procedure:-

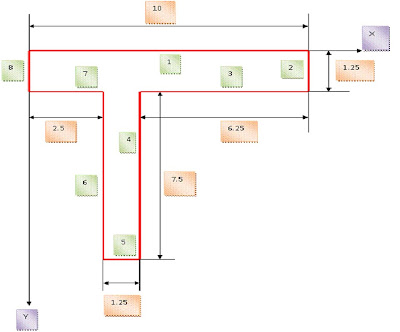
1.An outline of the piece part is drawn.

2.The X and Y axes are placed on it in a convenient position.

3.The outline of the piece part is divided into convenient line elements. These are numbered as 1,2,3 and so on.

4.The lengths l1,l2,l3 etc. of these line elements are determined.

5.The centroids of these line elements are determined.

6.The distance of the centroids from the X and Y axes is determined. Let x1,x2,x3etc. and y1,y2,y3 etc. be the distance of centroids of line elements l1,l2,l3 etc, from the X and Y axes respectively.

7.The distance of the centre of pressure from each axis is determined by the method of centroids. i.e.,

X =l1x1+l2x2+l3x3+………/l1+l2+l3+………………..

And

Y = l1y1+l2y2+l3y3+……/ l1+l2+l3+……………..

Where,
X = x distance to centre of pressure
Y = y distance to centre of pressure


Example for how to calculate centre of pressure


All dimensions are in cm


Elements l x y lx ly


1 10 5 0 50 0


2 1.25 10 0.625 12.5 0.781

3 6.25 6.875 1.25 42.969 7.813

4 7.5 3.75 5 28.125 37.5

5 1.25 3.125 8.75 3.906 10.937

6 7.5 2.5 5 18.75 37.5

7 2.5 1.25 1.25 3.125 3.125

8 1.25 0 0.625 0 0.781

--------------- ----------- -----------

37.5 159.375 98.437


∑l = 37.5

∑lx = 159.375

∑ly = 98.437

There fore, X = ∑lx/∑l = 159.375/37.5 = 4.25

Y = ∑ly/∑l = 98.437/37.5 = 2.625

DESIGN PRINCIPLES FOR DEEP DRAWING IN SHEET METAL

Key design principles for successful deep drawing

Successful deep drawing depends on many factors. Ignoring even one of them during die design and build can prove disastrous. However, regardless of the many factors involved, the most important element to a successful deep drawing operation is initiating metal flow. The following are key elements affecting metal flow, and each of them should be considered when designing, building, or troubleshooting deep drawing stamping dies:
1. Material type
2. Material thickness
3. N and R values
4. Blank size and shape
5. Part geometry
6. Press speed (ram speed)
7. Draw radii
8. Draw ratio
9. Die surface finish
10. Die temperature
11. Lubricant
12. Draw bead height and shape
13. Binder pressure
14. Binder deflection
15. Standoff height
Because thicker materials are stiffer, they hold together better during deep drawing. Thicker materials also have more volume, so they can stretch longer distances.
The N value, also called the work hardening exponent,
describes the ability of a steel to stretch. The R value—the plastic strain ratio—refers to the ability of a material to flow or draw. Blank sizes and shapes that are too large can restrict metal flow, and the geometry of parts affects the ability of metal to flow. Press speeds must allow time for materials to flow.
Die surface finishes and lubricants are important because they can reduce the coefficient of friction, allowing materials to slide through tools more easily. Die temperatures can affect the viscosity of lubricants.
As a controller of metal flow, draw bead height and shape can cause materials to bend and unbend to create restrictive forces going into a tool. Increasing binder pressure exerts more force on a material, creating more restraint on material going into the tool.
The remaining key elements affecting metal flow are examined in more detail in the remainder of this article. To illustrate the principles of metal flow, this article examines two basic draw shapes, round and square. All deformation modes that occur in any given part shape are present in one of these common shapes.


a

Figure 1
In the illustration of incorrect draw ratio (L), the too-small post would cause metal to thin to the point of failure, while the correct draw ratio (R) will result in a successfully deep drawn part.

The draw ratio is among the most important elements to be considered when attempting to deep draw a round cup. The draw ratio is the relationship between the size of the draw post and the size of the blank. The draw ratio must fall within acceptable limits to allow metal to flow.

During forming, a blank is forced into circumferential compression, which creates a resistance to flow. If the resistance is too great, the cup fractures. If the post is too small or too far from the blank edge, the metal stretches and thins to the point of failure. If the post is the appropriate distance from the blank edge, and the die entry radius is acceptable, the metal can flow freely, progressively thickening as it enters the die cavity (see Figure 1).

When a very tall small-diameter part is being processed, draw reductions likely will be necessary (see Figure 2). A draw reduction is a process in which a part is first formed within acceptable draw ratio limits and then is progressively reduced or reshaped to a desired shape and profile.


Figure 2
Reduction percentages for various thicknesses of draw-quality steel.
The most important factor to remember when performing draw reductions is that all of the material necessary to make the final part shape must be present in the first draw. Figure 3 is a reduction chart for the first, second, and third draws with draw-quality steel. Reduction percentages are based on metal thickness and type.
To determine the post diameter and height of the first draw, the total surface area of the finished part must be calculated. (If the part is to be trimmed, allow additional material during this calculation.) The

calculated surface area is then converted into a flat blank diameter.


Figure 3

During draw reductions, the blank diameter should not change after the first draw.
The primary step in calculating the first draw post diameter is determining the blank diameter. Multiplying the blank diameter by the percentage given in the chart, and then subtracting the result from the original blank diameter, yields the diameter of the first draw post. It is important to remember that all dimensions are taken through the centerline of the material. The height of the first draw is an area calculation directly related to the amount of material necessary to make the finished part.


Die Entry Radii
Other important factors for successful deep drawing are the size, accuracy, and surface finish of the die entry radius. Decisions regarding the die entry radius should be based on material type and thickness.

If a die entry radius is too small, material will not flow easily, resulting in stretching and, most likely, fracturing of the cup. If a die entry radius is too large, particularly when deep drawing thin-gauge stock, material begins to wrinkle after it leaves the pinch point between the draw ring surface and the binder. If wrinkling is severe, it may restrict flow when the material is pulled through the die entry radius.


Figure 4
Minimum die entry radii are shown in this chart for round draws involving various thicknesses of draw-quality steel.

Figure 4 provides general guidelines for die entry radii for round draws of draw-quality steel ranging in diameters from about 1.5 to 15 inches.

The die entry must be produced accurately in a fashion that makes it true and complete. It should be hook-free and polished in the direction of flow. High-wear tool steel should be used for die entry radii.


Binder Pressure

Sufficient binder pressure must be present to control metal flow. If binder pressure is inadequate, the material wrinkles during compression. The wrinkles then cause the binder to further separate from the draw ring surface, and control of the material will be lost. Wrinkles will also be forced to unwrinkle when the material is squeezed between the post and the cavity walls. This can pull metal on the top of the cup and result in fracture.

The problem of too much binder pressure can be overcome by using standoffs. Standoffs maintain a given space between the draw ring surface and the binder, and they should be set at 110 percent of the metal thickness to allow for compressive thickening. If the standoff gap is too small, the material will be pinched tightly between the draw ring and the binder surface, reducing its ability to flow freely. If the standoff gap is too large, the material will wrinkle during circumferential compression.

The recommended binder pressure for round draws of low-carbon draw-quality steel is 600 pounds per lineal inch around the post (draw post diameter x 3.141). For high-strength, low-alloy, and stainless steels, 1,800 pounds of pressure per lineal inch should be used.

Other guidelines to remember when the processing draw reductions are:
1. Design open-ended draw cavities for draw depth adjustment.
2. Once the proper draw ratio is achieved, metal will flow and the part can be drawn partially or completely off the binder.
3. After the first draw, the blank diameter should not change.
(See Figure 3).


Square Draws

Figure 5

Square draws are similar to round draws because they contain four 90-degree profile radii. Because of the radial corner profile, material flowing toward the corners is forced into compression. The straight sections of the square are simply being bent and unbent. Considerably less flow restriction takes place in the straight walls of a square draw than in the corners (see Figure 5).
Increasing the profile radius of the draw greatly increases the ability to draw deeper in a single operation (see Figure 6) because a larger-profile radius reduces compression. Too much compression in a corner restricts metal flow, resulting in fracture.
Increasing the profile radius and reducing the blank size reduce forming severity. Mitering the corners of the blank also can help to reduce compression.
To help balance metal flow conditions during square draws involving heavy metals, it may be necessary to draw spot the corner areas of the binder or draw ring face with respect to the increasing material thickness. This process allows metal to thicken in corners without being pinched excessively between the draw ring and the binder.


Figure 6


If a proper draw spot is achieved, blank holding force is evenly distributed through the perimeter of the drawn shell. When thin metal is used, draw spotting the corners may cause undesirable wrinkling in the relieved areas. This results primarily from a lack of control of the metal flow and the inability of thin stock to resist wrinkling.
If the square drawn shell is too tall to be drawn in a single operation, it must undergo a draw reduction. As with round draws, all material necessary to make the final part must be present in the first draw. Draw reductions for square shells are achieved by increasing the profile radius to acceptable compression limits and increasing the width and length to obtain the necessary surface area of the finished part.

Other guidelines to follow when drawing square shells include
:
1. Use the minimum blank size required to make the part.
2. Use standoffs to control metal flow, not binder pressure.
3. To redraw a square shell, increase the width, length, and profile radius of the first draw to contain the necessary surface area of the final part geometry.

Successful deep drawing is a combination of many important factors. This article highlights only the most frequently violated design and build principles. Although designing and building deep draw dies is fast becoming a science, the fundamental metal flow principles should never be ignored, for they are the foundations of a successful deep drawing operation


GENERAL PRESS WORK AND STAMPING MANUFACTURE

General presswork and stampings manufacture, with pressings produced up to 6mm thick and made in the UK.
General Presswork, Pressings and Stampings,produced on a range of power presses up to 150 tonnes.
Materials processed are, most grades of mild steel, copper, aluminium and stainless steel.

Light stampings produced at A & R.
Press tools are made in house, from either blanking and forming tools to complete progression tooling. Components are made from mild steel, stainless steel and aluminium in all grades and thicknesses, from 0.3mm aluminium up to 6mm mild steel.
A selection of pressed out components fromA & R Engineering Ltd.
Please also see the presswork tooling and design section for more examples of general press tooling and opened up progression tools.
Heavy presswork made at A & R.
In the heavy pressings section, we have power presses up to 150 tonnes. See the companies plant list for more information on our machinery. Some of the metal pressing brackets shown above, are 6mm thick.

Shown above, are grain cooling floor panels.
These louvered pressings are produced with custom made tooling at A & R Engineering Ltd. The heavy duty drive over floor panels are use in agriculture, for cooling various cereal crops. They are positioned in concrete trenches where air is blown through. The air is passes through the trench and up through the louvered panel, where it cools the grain stored above. These panels are suitable for storage of oil seed rape, coffee, and all grain cereal crops..

Thin press work. Above is a lighting louver stamping produced at A & R Engineering Ltd.
Click here, for the lighting louver department, and more information on these type of products.


Fax: 01255 427743 E-mail: sales@arengineering.co.uk Tel: 01255 434261
A & R Engineering Ltd., home of pressings and presswork manufacture.
var sc_project=269873;

SCRAP STRIP LAYOUT

SCRAP – STRIP LAYOUT

In the design of blanking parts from strip
material, the first step is to prepare blanking layout,
that is, to layout the position of the workpieces in the
strip and their orientation with respect to one another.
While doing so, the major consideration is the economy
of material.
Another important consideration in strip layout is
the distance between the blanks and the strip edge and
distance between blank to blank. To prevent the scrap
from twisting and wedging between the punch and the
die. The distance must increase with material thickness.

A general rule of thumb is to keep this distance equal
to from 1 to 1.5times the material thickness. The following
figure are example of strip layouts.


A – Front scrap
B – Bridge thickness
(space between parts and strip edge,and part to parts)
C – the distance from a point on one part to the
corresponding point on the next part.
H – Part width
l - Length of part
W – Width of strip
Y – Scrap recovery at end
N – Number of blanks
t– thickness of strip
L – Length of strip

B= 1.25t, when C is less than 2inch
= 1.5t, when C is more than 2inch
C = l + B
W = H + 2B
A = t + 0.015H
Y =L – Nc +B
N = L – B /C


PERCENTAGE OF UTILIZATION

Strip layout is important to have economy of press
tool operation. Scrap strip layout gives an idea on the
positioning of various punches, stops and pilots.
It ensures the ideal location of blanks in the stock strip.
Several trial layouts have to be made to confirm the
maximum percentage of utilization of stock strip. The
goal should be to have at least 75% utilization.

The percentage of stock used to calculated by the
formula:

% of utilization = Area of one blank X 100 /Lead X Width

Where, Lead = Length of component + Bridge thickness
Width= Breadth of component + 2 X Bridge thickness
-----------------------------
EXAMPLE 1: FOR STRIP LAYOUT CALCULATION


Length of part = 20mm : Breadth of part = 10mm
Thickness of part =1.5mm

Bridge thickness = one times of sheet thickness taken
= 1.0 X 1.5 = 1.50mm

Width of strip W = H + 2B
= 20 + 2 X 1.5 =23mm

Front scrap “a” = t + 0.015H
= 1.5 + 0.015 X 20
= 1.8mm

C =l + B = 10+1.5 =11.5mm


FUNDEMENTALS FOR DESIGNING PRESS TOOLS:
-----------------------------------------------------------------------
CLEARANCE:
Clearance is the intentional space(gap)
between the punch and die cutting edges.
Proper clearances between the punch and die cutting
edges enables the fracture to meet, and the fracture portion
of the sheared edge has a clean appearance.
For improper clearances, cracks donot meet and
ragged edge results due to the material being dragged and
torn through the die.
Clearances are calculated by depending upon the
materials thickness and their cutting allowances. The usual
clearances preside of the die for various materials are
given below, in terms of the stock thickness “t”.

For copper, aluminium, brass and soft steel = 3 to 5% of t
For medium steel = 6% of t
For hard steel = 7% of t

Excessive cutting clearance provides larger burr
on the components and gives long tool life. Insufficient
cutting clearance prevents a clear break. It also increase
pressure on punch and die, thereby reduces the tool life.

Correct cutting clearance will allow the fractures
to meet evently resulting in a clear break and the sheared
edge as a clear appearance and minimum burr.

HOW TO APPLY CUTTING CLEARANCE
PIERCING OPERATION
:
In piercing operation, clearance is given to the die.
The component size is equal to the punch .
Here slug is a scrap.
Die opening size = Hole to be pierced +2C.
BLANKING OPERATION:
In blanking operation, clearance is given to the punch.
The component size is equal to the die.
Here slug is desired part.
Blank punch size = Hole to be blanked – 2C


PUNCH AND DIE CLEARANCE AFTER CONSIDERING
THE ELASTIC RECOVERY OF THE MATERIAL:

In blanking operation, after the release of blanking
pressure, the blank expands slightly. The blanked part is
actually larger than the die opening that has produced it.
Similarly in piercing operation, after the strip is
stripped off the punch, the material recovers and the hole
contracts. Thus, the hole is actually small then the size of
the punch which produced it.
Thus to produce correct hole and blank sizes,
the punch size should be increase and the die opening
size should be decreased by an amount fo elastic recovery.
The elastic recovery will depend upon blank size,
stock thickness and material. It may be taken as between
0.0125mm to0.075mm.
For stock thickness upto 0.25mm,
this difference may be taken as zero.
For stock thickness 0.25mm to 0.75mm
—It may be equal to 0.025mm.
For stock thickness more than 0.75mm
—It may be taken as 0.05mm.


EXAMPLE: 1 FOR APPLICATION OF CLEARANCE:


A washer component has outer diameter is 30mm and
inner diameter is 10mm and stock thickness is 1.0mm .
material grade is mild steel.(soft steel)
Solution:
Cutting clearance = material thickness X cutting allowance
= 1.0 X 5%
= 1.0 X 5 / 100
=0.05mm per side.
Here elastic recovery taken as 0.05mm.

In blanking:
blank die opening size = part size – elastic recovery
= 30 – 0.05
= 29.95mm.
blank punch size = die opening size – 2C
= 29.95 – 2 X 0.05
= 29.85mm.

In piercing:
piercing punch size = part hole size + elastic recovery
= 10 +0.05
= 10.05mm.
piercing die opening size = punch size + 2C
= 10.05 + 2 X 0.05
= 10.15mm
----------------------------------------------------------------------


EXAMPLE 2: APPLICATION OF CLEARANCE:


Here a rectangular part has 50mm length, 30mm width
and material thickness is 1.5mm. It has dia 5mm holes
at 4 corners and a center hole is dia 15mm.

Solution:
Cutting clearance = material thickness X cutting allowance
=1.5 X 6%
=0.09mm preside.
Here, elastic recovery taken as 0.05mm.

Piercing-1: 4 Holes at corners
Punch size = 5.0 +0 .05 = 5.05mm
Piercing die size =5.05 + 2 X 0.09 = 5.23mm.

Piercing –2: center hole
Punch size = 15 + 0.05 = 15.05mm
Piercing die size = 15.05 + 2 X 0.09 =15.23mm.
Blanking
Die opening size = lenth is 50 – 0.05 = 49.95mm
=width is 30 – 0.05 = 29.95mm.

Blank punch size = 49.95 – 2 X 0.09 = 49.77mm.
= 29.95 – 2 X 0.09 =29.77mm.


PRESS TOOL ACCESSORIES:


DIE SET:
It is the unit assembly which incorporates a topshoe
and bottom shoe, two or more guide pillars and guide
bushings.
Advantages: 1) It aligns the punch and die members.
2) It reduces the setup time in the press
to a minimum.
3) This facilitates resharpening of punch
and die without removing from
the dieset.
TOP SHOE:
This is the upper part of the dieset which contains
guidebushings and punch holding assembly. It is directly
fastened to the press ram with the help of shank.
BOTTOM SHOE:
This is the lower part of the dieset which contains
guide pillars.
It is generally mounted on the press bed. The die block
is mounted on the bottomshoe.
PUNCH:
Punch is the male part of the die assembly,
which is directly or indirectly moved by and fastened
to the press ram.
Punches are made from good grade of tool steel
or high carbon high chromium steel material and it is
hardened.
Punch is the master of piercing.
DIE:
Die is the female part of the die assembly, which
is mounted on the lower shoe.
Dies are made from tool steels or high carbon high
chromium steel and it is hardened.
Die is the master of blanking.

BACKUP PLATE:
Backup plate or pressure plate placed between the
top plate and punch holder plate.It is a hardened one.
It is used to prevent the punch making any impression
on the soft top plate.
The plate distributes the pressure over a wide area
and the intensity of pressure on the punch holder is reduced
to avoid crushing.Backup plates are made from OHNS
materials and carbon steels(C45) and it is hardened and
ground parallel.
(OHNS-Oil hardened non-shrinkage steel)
The thickness of the backup plate depends upon
the stock thickness.

For upto 2mm stock thickness, 3mm thickness
backup plate is used.
For about 3mm stock thickness, 6mm thickness
backup plate is used.

PUNCH HOLDER PLATE:
It is fastened to the top plate through the backup plate.
It is used to hold the punch correctly.These plates are made
from mild steel material.

GUIDE PILLARS AND GUIDE BUSHINGS:
Guide pillars are mounted on the bottom shoe and
guide bushings are mounted on the top shoe.Both they are
press fitted on their plates. Pillar and bush have a slide
fit to them. They are help in obtaining alignment of the
punch and die. These are made from carbon steels and
hardened and ground.


STRIPPER PLATE:
This plate is mounted on the die plate.It is called
as fixed stripper plate. A channel is provided in this plate
for feeding the metal strip.It is used to stripout the strip
from the punch during the return stroke of the press.
It is also helps to correctly guide the punch into the
dieopening. In some cases, it is mounted to the punch
assembly. It is called as spring loaded stripper.


PRINCIPLE OF METAL CUTTING

PRINCIPLE OF METAL CUTTING:


The cutting of sheet metal in press work is a shearing
process.The punch and die have same shape of the part.
The sheet metal is held between punch and die.The punch
moves down and presses the metal into the opening of the
die.
There is a gap between the punch and die opening.This is
called as “Clearance”. The amount of clearance depends
upon the type and thickness of the material.
The punch touches the metal and travels downward.
The material is subjected to both tensile and compressive
stresses. By this pressure, the metal is deformed plastically.
The plastic deformation takes place in small area between
punch and die cutting edges. So the metal in this area is
highly stressed. When the stress exceeds the ultimate
strength of the material,fracture takes place.
The cutting edge of the punch starts the fracture,
in the metal from the bottom.The cutting edge of the die
starts the fracture from the top. These fractures meet at
center of the plate.
As the punch continuous tomove down, the metal
under the die is completely cutoff from the sheet metal.
The cut out portion of the metal drops down through
the die opening.To make the metal to drop down freely,
a die relief is given in the die block.
If the clearance is too large or too small cracks
do not meet and a ragged edge results due to the
material being dragged and torn through the die.

TYPES OF DIES BASED ON CONSTRUCTION

TYPES OF DIES BASED ON CONSTRUCTION
1 SIMPLE DIES:

Simple dies or single action dies perform single
operation for each stroke of the press slide. The operation
may be any one of the operations listed under cutting or
forming dies.

2.COMPOUND DIES:
In compound dies,two or more cutting operations
may be performed at one station by one stroke of the press.
Compound dies are more accurate and economical in mass
production as compared to single operartion dies.
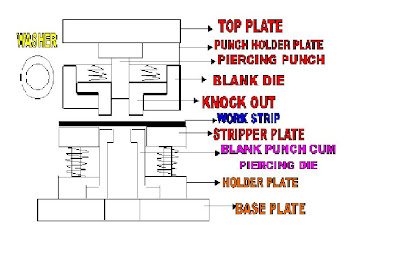
For example, a washer component is made by one
stroke of the press in compound die. The washer is produced
by simultaneous blanking and Piercing operations.

Die construction:
Here the blank punch cum piercing die is
mounted on the bottom of the bottom plate which
is bolsted with machine bed. Blank die and piercing
punch are mounted on the top plate which is mounted
on the press ram. A knockout is placed between
blankdie and piercing punch which is used for to
eject the component from the die. A stripper plate is
held with blank punch which is to strip out strip from
the punch after the operation completed.


3.COMBINATION DIES:
In combination dies more than one operations may be
performed at one station. It is differs from compound dies.
In combination dies cutting and non- cutting operations done
at one station by one stroke of the press.


1.BACKUP PLATE 2.PUNCH HOLDER PLATE
3.BLANK PUNCH CUM DRAW DIE 4.KNOCKOUT
5.STRIPPER PLATE 6.DIE PLATE 7.PRESSURE PAD
8.FORMING PUNCH 9.BASE PLATE.

A cup shaped component is produced in combination dies.
Blank punch cum draw die is mounted on the punch holder and
it is fastened to the press ram.Knockout is held inside the blank
punch which is push out the part from the draw die. A stripper
plate is also held with blank punch.
Blank die and inner size form punch are mounted on the
base plate which are held on the press bed. Pressure pad is
placed between blank die and form punch, which is used for
giving uniform drawing and also to eject the cup from the
form punch.
The sheet metal is placed between the blank punch
and die. During operation, the blank punch first cut
the outer of the blank in sheet metal and also
to form as a cup. Pressure pad helps the uniform and
rigid formation of cup. A diecushion is permanently
mounted under the press machine bed, which helps
uniform drawing and also to eject the part after return
stroke of ram.


4.PROGRESSIVE OR FOLLOW DIE:
Progressive die has a series of stations. At each station
, an operation is performed on a workpiece during a stroke of
the press.Between stroke, the piece in the metal strip is
transferred to the next station.A finished work is made at
each stroke of the press.


For example, in progressive die a rectangle blank part
have two round holes at corners and a one square hole at
the center.
Here the component is completed for three station.
At first station,two coner holes to be pierced on the sheet metal.
At second station,first the pilots are correctly guide the already
pierced holes and then center square hole is done one the
sheet metal.At that same time,two corner holes are pierced out
at first station for next component(second part).
Then the strip is moved at station-3. In this stage,
the component is blanked out from the sheet metal. At the
same time,in first stagte,third part corner holes are produced
and in second stage,the second part have center square
hole piercing.The above stage operations are done
simultaneously.


5.TRANSFER DIES:
Unlike the progressive die where the metal stock is fed
progressively from one station to another. But in transfer dies,
the already out blanks are fed mechanically from
station to station.


6.MULTIPLE DIES:
Multiple or gang dies produce two or more
workpieces at each stroke of the press. A gang or number
of simple dies and punches are ganged together to
produce two or more parts at each stroke of the press.

7.INVERTED DIES:
In generally, in punch holder plate punch is held,
which is fastened to the ram. Die is fitted with die holder,
which is held on press bed.
But in inverted dies, the punch and die are to be
interchanged. Punch is held in bed and the die is fastened
to the ram.


SOLVED EXAMPLE IN TOOL DESIGN

SOLVED EXAMPLE:-1

A washer with a 12.7mm internal hole and an
outside diameter of 25.4mm is to be made from 1.5mm
thickness of strip of 0.2% carbon steel. Considering the
elastic recovery of the material.

Find (a) the clearance
(b) blank die opening size
(c) blank punch size
(d) piercing punch size
(e) piercing dieopening size

Solution:
(a)clearance for soft steel is taken as
C = 5% of t
= 5/100 X 1.5
clearance = 0.075mm/side.

(b)Blank dieopening size is equal to the blank size.
but to allow for the expansion of the blank,the die
opening should be made smaller, Thus,

Blank dieopening = Blank size – Elastic recovery
= 25.40 – 0.05
= 25.35mm.

(c)Blank punch size = Blank dieopening size – 2C
= 25.35 – 2 X 0.075
= 25.20mm.

(d)Piercing punch size is equal to the hole size.
But to allow for the contraction of the hole due
to elastic recovery, the punch is made larger,
Thus,

Piercing punch size = hole size + elastic recovery
= 12.70 + 0.05
= 12.75mm.

(e)Piercing die opening = Piercing punch size + 2C
= 12.75 + 2 X 0.075
= 12.90mm.


SOLVED EXAMPLE:-2

The strip thickness is 2.0mm and the length of
blank is 10mm and height is 20mm. Strip length is 1.0m.
Find (a) the value for front scrap
(b) the value for scrap bridge
(c) width of strip
(d) length of one part of stock needed to produce
one part.
(e) Number of parts which canbe produced in strip.
(f) Scrap maintaining at the end of strip.

Solution:


A = front scrap ; b = back scrap(bridge thickness)
l = length of part ; h = height of part
T = thickness of part; w = width of scrap
C = distance from part to part
Y = end of scrap; L = total length of scrap

Solution:

Length of part l = 10mm
Height of part h = 20mm
Thickness of part = 2.0mm
Total length of scrap L = 1.0m (= 1000mm)
(a)Front scrap and back scrap
a = t + 0.015h
= 2.0 + 0.015 X 20
= 2.30mm.
(b)Scrap bridge thickness = It is taken as one times
of sheet thickness
= 1 X 2.0
= 2.0mm.

(C) Width of strip W = Height of part + 2bridgethick
= 20 + 2 X 2
= 24mm.

(d) Length of one piece of stock needed to produce one
blank is,
C = l + b
= 10 + 2
C = 12.0mm.

(e) Number of parts in the strip
N = Total length of strip – bridge thickness
C
= L – b
C
= 1000 –2
12
N = 83 blanks produced.

(f) Scrap remaining at the end
Y = L – (Nc+b)
= 1000 – (83 X 12 + 2)
= 2.0mm.

SOLVED EXAMPLE:-3

A washer with a12.7mm hole and an outside
diameter of 25.4mm is to be made from 1.50mm
hickness Of strip of 0.2% carbon steel. The ultimate
shearing Strength of the material is 2800Kg/C
(1) Find the total cutting force if both punches act at
the same time and no shear is applied to either
punch or die.

(2) What will be the cutting force if the punches are
staggered. So that only one punch acts at a time.

(3) Taking 60% penetration and shear on punch of
1.0mm. What will be the cutting force if both
punches act together.

Solution:

(1)Cutting force F = П(D + d)st
D=25.4mm; d=12.7mm; t=1.5mm
Shear strength S=2800Kg/Cm2 = 28Kg/mm2.
F = П(25.4+12.7)X1.5X28.0
= 5.027 tonnes.


(2)When the punches are staggered, the punch taking
the largest cut will require the greatest force.

F=ПDst
=П X 25.4 X 28 X 1.5
=3.35 tonnes.

(3) F = t X K X Fmax
K X t X I
K = percentage of penetration = 0.6
I = shear on punch = 1.0mm
Fmax = 5.027 tonnes.

F = 1.5 X 0.6 X 5.027
(0.6 X 1.5)+ 1.0
= 2.38tonnes.

SOLVED EXAMPLE:-4

A hole of 60mm diameter is to be produced in
steel plate 2.5mm thick. The ultimate shear strength
of the material is 45Kg/mm2. If the punching force
is reduced to half of the force using a punch without
shear. Estimate the amount of shear on the punch.
Take % of penetration as 40%.

Solution:

The punching force with non-sheared punch.
Fmax = ПDst
= П X 60 X 45 X 2.5
= 21.20 tonnes.

Work done = Fmax X penetration(punch travel)
= 21.20 X 0.4t
= 21.20 X 0.4 X 2.5
= 21.20tonnes.

Now workdone remains the same with a sheared and
A non-sheared punch,
Punch travel = penetration + shear
= K.t + I

If F is the blanking force, then comparing the workdone,
Fmax X K X t = F(K.t + I)
I= K X t (Fmax – F)
F
Now, F = ½ Fmax
= 10.6tonnes.

I = 0.4 X 2.5 X 10.6
10.6
I = 1.0mm
So the amount of shear on punch is 1.0mm.